

WordPress 的安装和数据备份及迁移是基本知识。
AppX @ifeegoo https://www.ifeegoo.com/appx.html。
我个人推荐的是使用自购服务器来使用 WordPress 搭建自己的博客,这样可定制化和个性化程度也会很高,同时访问速度也比挂在 GitHub 或者国外的服务器好很多。其他的博客程序的搭建,网上有蛮多教程,大家 Google 一下就好。接下来我就先和大家一起探索如何利用自建服务器搭建 WordPress 博客。
温馨提醒:不懂服务器,没关系!没关系,真的没有关系!你不需要去学习一大堆的知识,然后才来操作服务器这块,完全没有必要。不要怕,不要怕,完全没有你想象的那么困难和需要那么多的服务器端的知识,我只会移动端的开发,对于服务器端的开发根本不懂,但是这个也不妨碍我用自购的服务器搭建 WordPress 博客。一步步的按照流程走,就可以了!
首先你需要购买一台服务器,现在国内有诸如阿里云、腾讯云等云服务器厂商,价格也不是很贵,还是能够承担得起,我目前个人使用的是腾讯云的服务器,选择腾讯的服务器有几个原因:
1.公司层面曾经也选择使用过阿里云和腾讯云的服务器,两者的稳定性都还好,但是之前阿里云的服务器经常受到一些什么黑客攻击(可能是我们恰好碰到了)。
2.腾讯的账号管理起来比较方便,一个 QQ 账号搞定,同时他能够提供很多配套服务:域名、网站统计等。当然阿里云也可以提供,但是阿里云的账号繁多,很多账号不互通,而且相互关联绑定关系很混乱,之前公司层面就出现过问题,很是麻烦。
3.腾讯云的管理后台的用户体验要比阿里云的要好(个人看法)。
所以我推荐腾讯云的服务器,大家进入选择购买一款服务器:https://buy.cloud.tencent.com/cvm
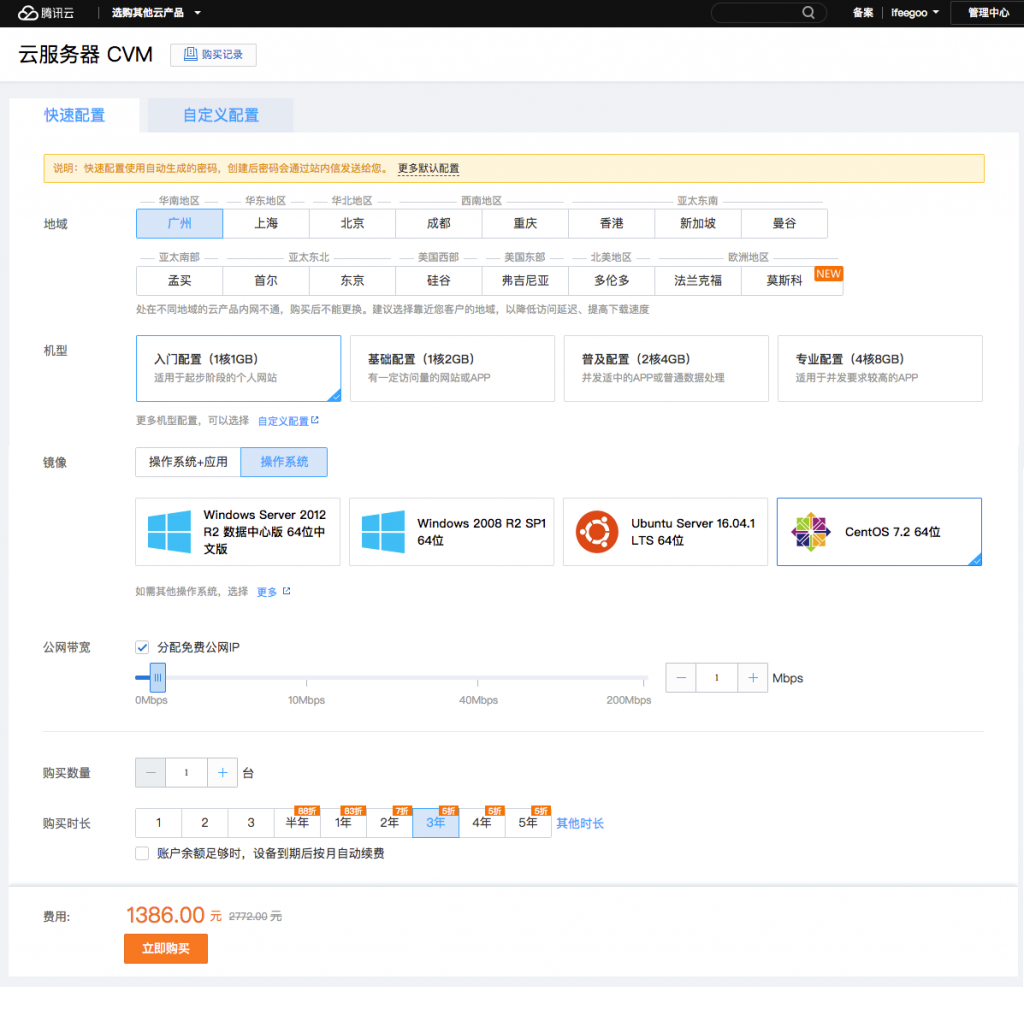
参数选择如下:
地域:选择一个离你近的地方。我这边是深圳,就选择广州了。
机型:选择入门配置。上面也说了,适合起步阶段的个人网站。
镜像:选择操作系统。有的人可能会问为什么不选择:操作系统 + 应用 这个呢?里面直接提示有自带的 WordPress 哦。这个我不建议选择这个,因为你还需要自己手动配置相关的数据库连接,对于新手来说,不适合。选择操作系统为:CentOS 7.2 64 位。
公网带宽:勾选分配免费公网 IP,1Mbps 即可。
购买数量:1 台。
购买时长:推荐选择 3 年,有五折优惠。
空间大小:这款选择下,服务器默认的是 50GB,目前是够用了。
以上总共的费用,3 年服务器不到 1400 元,对于 IT 从业人员来说,完全可以承受。
如果你没有域名,也可以在腾讯云注册一个域名:https://buy.cloud.tencent.com/domain,域名注册流程比较简单,这里就不详细说明了。准备好了域名,就可以继续下一步了。
特点:简单粗暴、直截了当、还很爽
适用对象:不太懂服务器的初学者
程序安装:
我们去到腾讯云的服务器管理后台,选择你刚才购买的那台服务器:更多 -> 重装系统:

我们选择:服务市场 -> 基础环境 -> WordPress(CentOS 7 开机即用),然后输入服务器的密码,直接开始重装。之所以重装一次系统,是因为之前在购买系统的地方不能选择包含 WordPress 的开机即用镜像。我们选择这个镜像的原因就在于:已经配置好相关的环境和数据库连接,只需要配置 WordPress 的一些基础信息就可以用,这个对于不懂服务器,不懂 php + MySQL 与 WordPress 的配置的用户来说,简直太方便了!
重装好了之后,我们直接用这个服务器的公网 IP 来在浏览器中访问,会自动跳转到 WordPress 的安装流程入口:
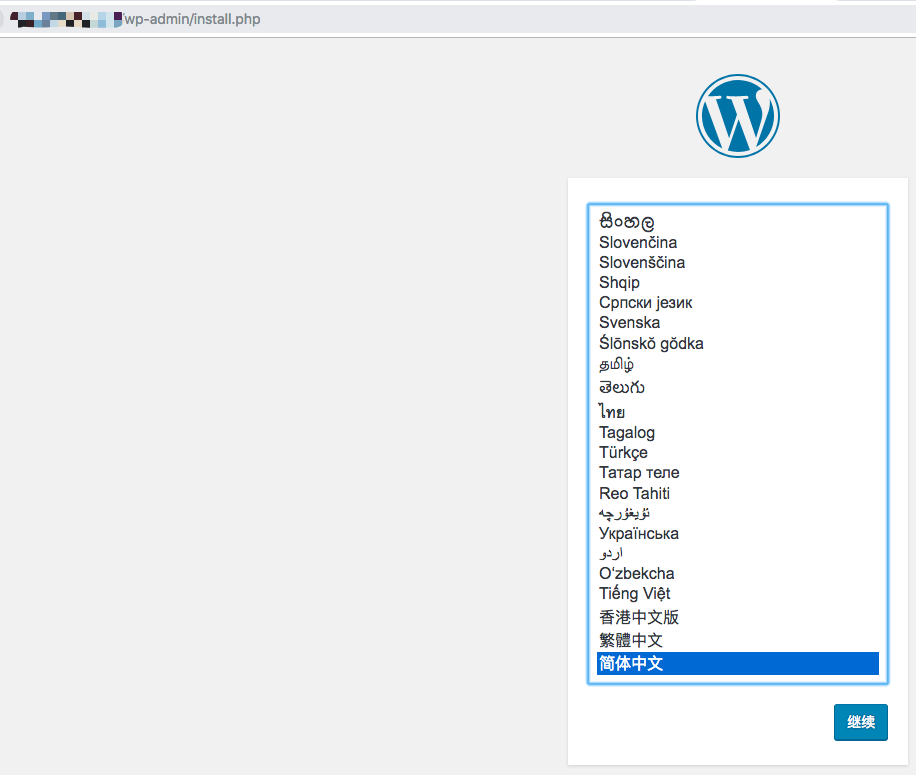
选择简体中文,然后点击继续:
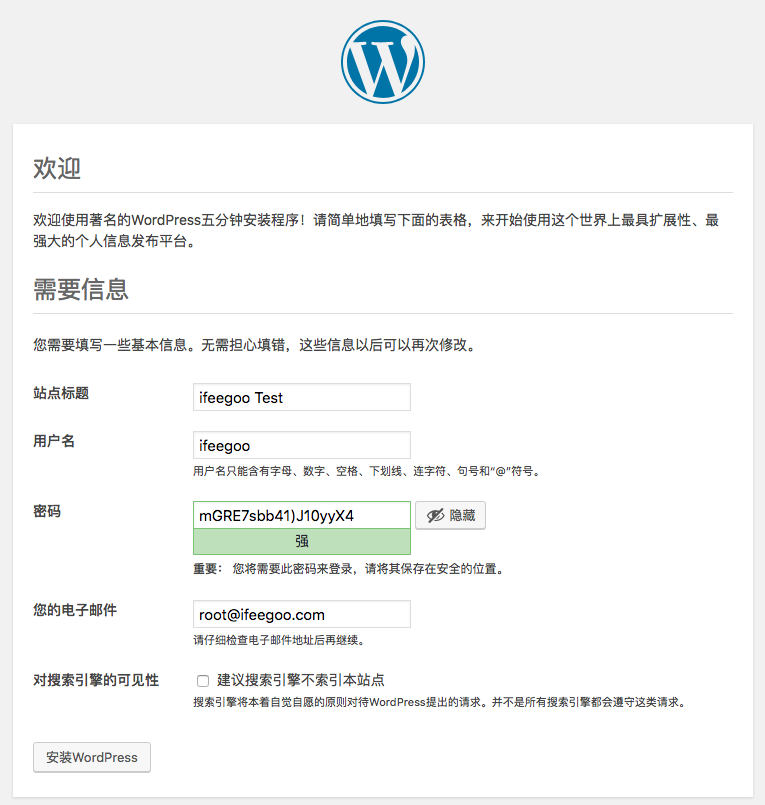
配置好相关的信息之后,自己保存登录用户名和密码信息,点击安装 WordPress:
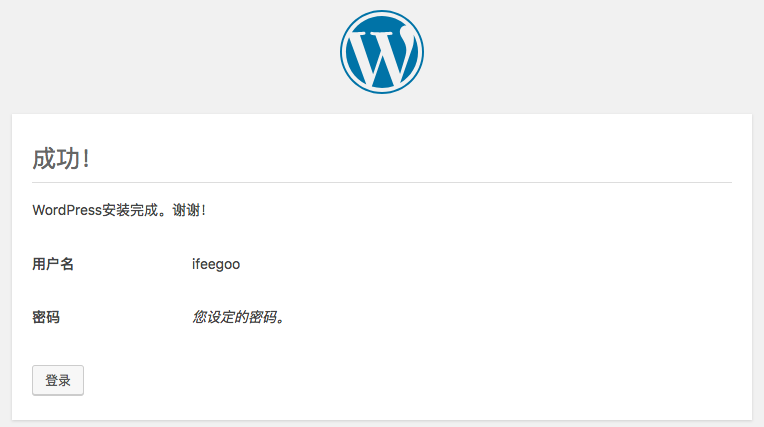
显示成功之后,点击登录,进入管理后台:
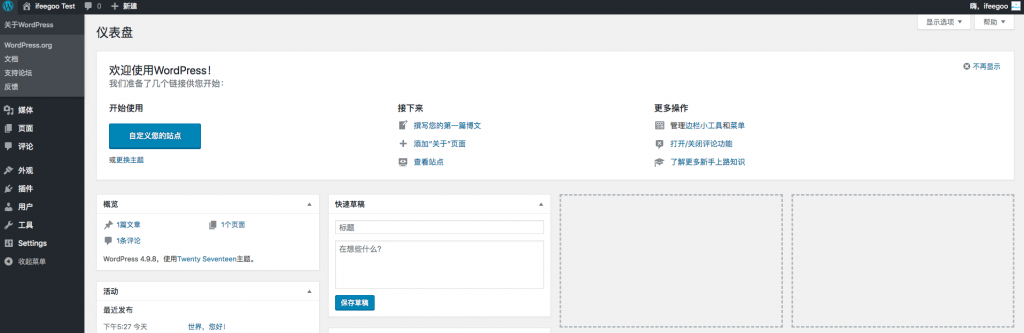
以上界面已经一目了然了,就不过多的描述。然后我们在后台尝试发布一篇测试文章,去到前台查看是否发布成功:

没有问题,但是你发现访问的链接地址还是以 IP 地址打头,这个时候我们就需要配置 WordPress 博客以域名的形式访问了,域名绑定服务器 IP 地址,可以理解为互相绑定指向的过程,首先我们去到域名管理后台:

添加以上两条记录,第一条记录的作用是:地址栏输入 futureelements.club 会自动跳转到 www.futureelements.club。这个做法是有利于 SEO 的。第二条记录的作用是:将域名 futureelements.club 绑定到 IP 地址:123.207.249.246。这样就完成了域名端的配置。
我们去到 WordPress 的管理后台:设置 -> 常规:
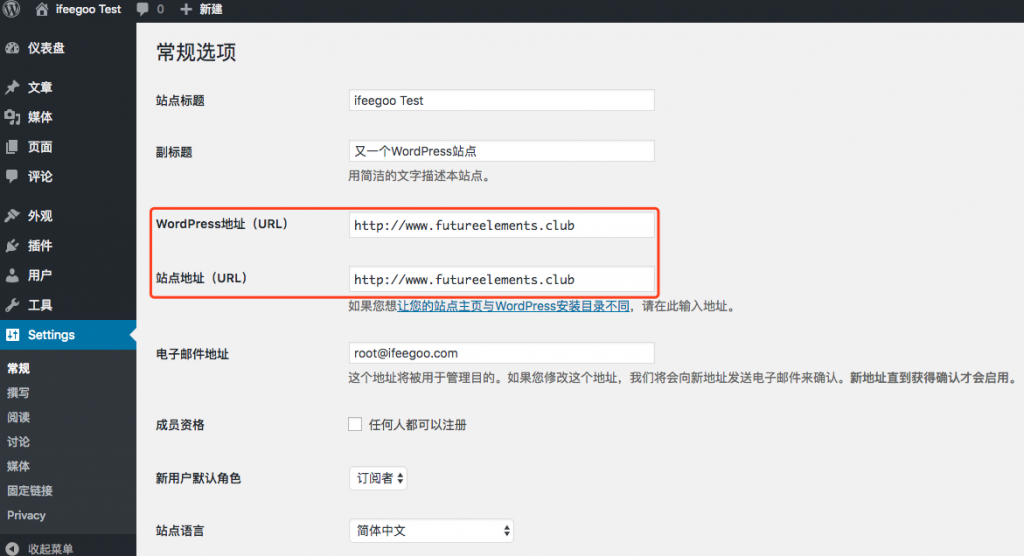
将 WordPress 地址和站点地址都修改成你要绑定的域名:http://www.futureelements.club。
备注:如果你在这里不修改的话,虽然你访问 http://www.futureelements.club 可以指向你的博客首页,但是单个文章的链接还是以 IP 地址打头的 URL。
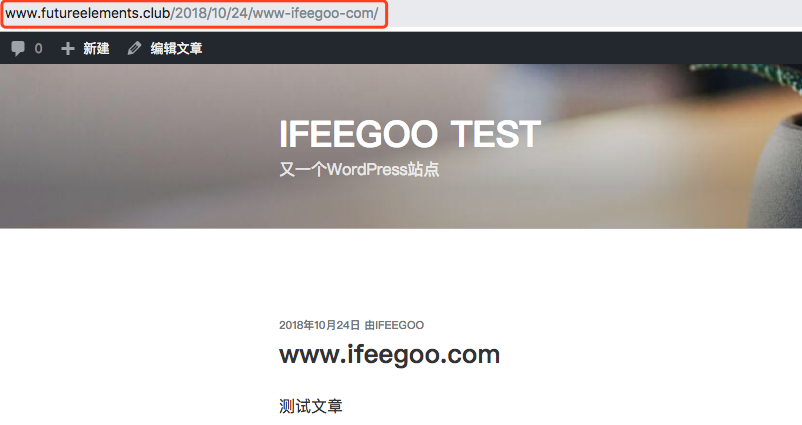
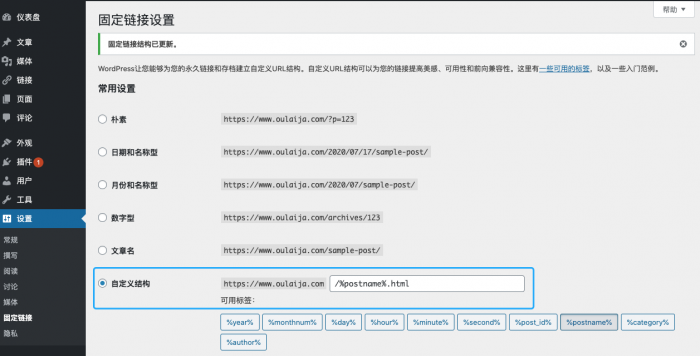
我们再去访问首页和单个文章,看下地址栏的链接,说明已经绑定域名成功了!URL 是不是看起来有点丑?这个是 WordPress 默认生成的,格式都是可以修改的。我现在的博客采用的文章链接形式是:www.ifeegoo.com/*.html 这种,比较有利于 SEO。
Tips:经过以上设置,我们就可以以域名形式来访问博客了,但是 IP 地址依然是可以访问的首页的,这个我们可以通过相关的配置禁止 IP 地址访问。
数据备份:
针对于这种形式安装的博客站点,我们可以通过简单粗暴而又直截了当,并且很爽的一种方式来备份和迁移数据:制作服务器镜像和利用服务器镜像来恢复或者迁移数据。
先去腾讯云的服务器管理后台,找到对应的服务器:操作 -> 更多 -> 云主机状态 -> 关机。制作系统镜像,需要先将服务器关机。确认好关机之后,我们再:操作 -> 更多 -> 制作镜像。
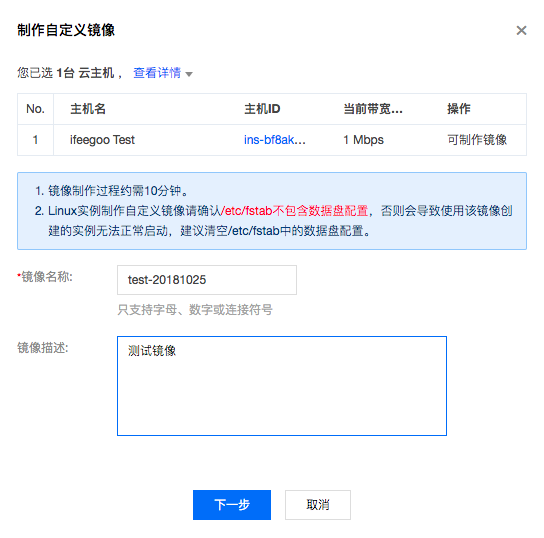
我们点击下一步,完成制作镜像步骤。去到腾讯云云服务器管理后台 -> 镜像一栏:
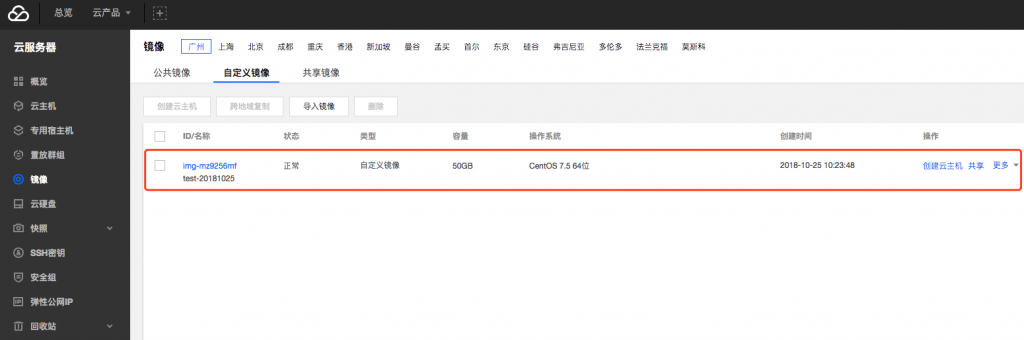
我们可以看到,已经有刚才我们制作生成的系统镜像文件了。针对这个镜像文件,腾讯云提供了诸如基于这个镜像来创建新的主机、共享镜像给其他腾讯云用户、还可以跨地域复制,当然也可以在已有的服务器上还原这个系统镜像。
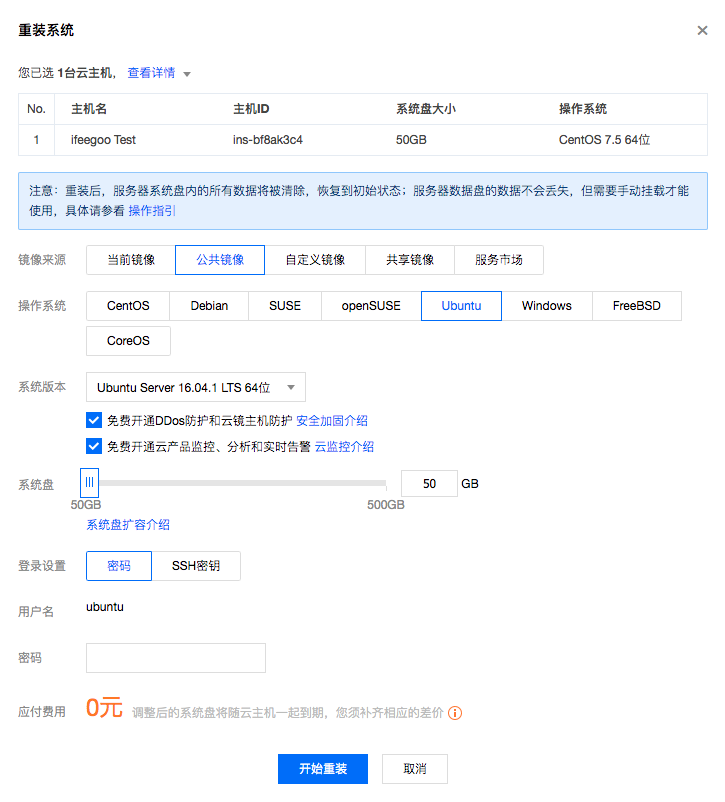
为了验证刚才我们生成系统镜像是否是先前我们使用的状态节点,同时也为了熟悉下恢复系统的流程,我们先将已有的服务器重置成其他状态:这里我们故意的将系统重置成 Ubuntu 的,随便选择一个就好。
然后我们重新访问原来的 IP 地址或者域名地址,现在已经无法访问了,表明我们已经重置系统到其他状态了。然后再次选择重装系统:自定义镜像 -> 选择我们刚才制作的镜像,输入密码,然后重装。
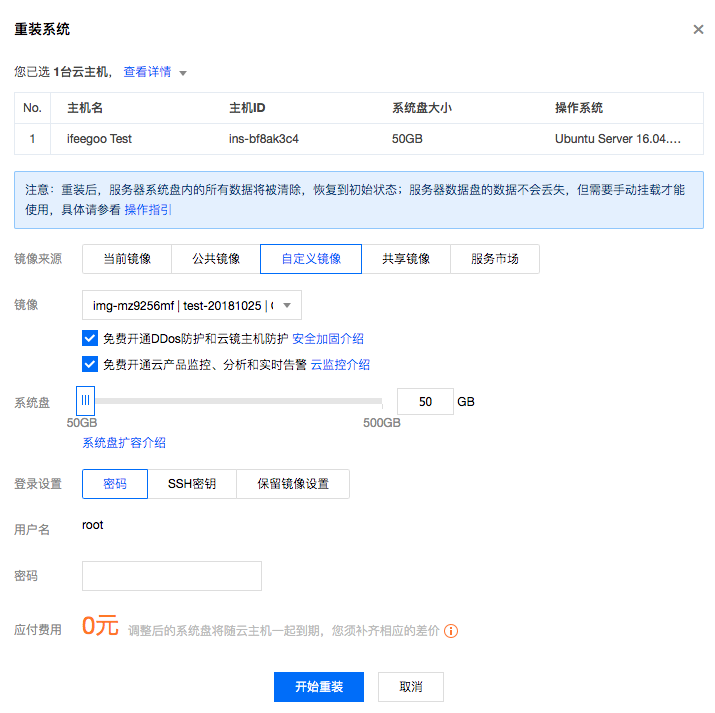
这个时候,我们再次访问原来的 IP 地址或者域名地址,已经可以访问了,并且原来发布的那篇测试文章还在,这个就说明系统镜像制作成功并且执行恢复成功!
说明:以上系统镜像默认的相关的数据都是存储在系统盘中的,所以用这种方式才可以完整的恢复相关的数据。如果你的数据是放到数据盘,那就还需要做数据盘的磁盘快照。系统通过镜像恢复之后,自己需要去挂载相关的数据盘了,因为制作系统镜像之前,不能挂载数据盘。
我们可以通过 df -h 命令来查看当前系统是否挂载了数据盘。如果没有挂载就只会出现如下的这种情况,如果有,还会出现诸如 /dev/vdb1 的盘。
[root@VM_43_216_centos ~]# df -h
Filesystem      Size  Used Avail Use% Mounted on
/dev/vda1        50G  5.2G   42G  11% /
还可以通过 fdisk -l 命令来查看当前系统是否有相关的数据盘:我这边显示的是有一块数据盘:vdb,我之前分过区。
[root@VM_43_216_centos ~]# fdisk -l

Disk /dev/vda: 53.7 GB, 53687091200 bytes
255 heads, 63 sectors/track, 6527 cylinders
Units = cylinders of 16065 * 512 = 8225280 bytes
Sector size (logical/physical): 512 bytes / 512 bytes
I/O size (minimum/optimal): 512 bytes / 512 bytes
Disk identifier: 0x00074875

   Device Boot      Start         End      Blocks   Id  System
/dev/vda1   *           1        6528    52427776   83  Linux

Disk /dev/vdb: 10.7 GB, 10737418240 bytes
16 heads, 63 sectors/track, 20805 cylinders
Units = cylinders of 1008 * 512 = 516096 bytes
Sector size (logical/physical): 512 bytes / 512 bytes
I/O size (minimum/optimal): 512 bytes / 512 bytes
Disk identifier: 0xd154c022

   Device Boot      Start         End      Blocks   Id  System
/dev/vdb1               1       20805    10485688+  83  Linux
如果你当前的 WordPress 程序可以完整的跑起来,并且当前系统没有相关联的数据盘挂载的话,就可以判定,你的数据都是在系统盘。就可以采用上面说的这种方式来进行整体数据备份了,这种方式很方便。
以上就是通过制作系统镜像和系统镜像恢复来完成整体的数据备份与恢复,是不是比较简单明了?有的人可能会有另外一个疑问,万一腾讯云服务丢失了我们的镜像该怎么办呢?这个问题考虑的很好,程序员一定要有安全意识。一般来说这种情况出现概率很低。腾讯云制作的系统镜像是不能导出的。为了保险起见,我们可以再用另外一种方式来备份你的数据,同时我们还会尝试自己手动安装 WordPress 环境和程序,手动导出和迁移 WordPress 数据。
适合:对于技术有一定的了解,但是又不是很熟的入门者。
我们知道 WordPress 主要是采用 PHP 开发的,数据库可以用 MySQL,我们在 CentOS 服务器上跑的话,就需要搭建一个 LNMP(Linux + Nginx + MySQL + PHP)/LAMP(Linux + Apache + MySQL + PHP) 环境,对于 Web 服务选择,我个人倾向于 Nginx,当然 Apache 也是可以的。
接下来我们就一步步的搭建相关的环境,关联相关服务和配置,完成一个支持 https 及域名访问的 WordPress 博客生效:
如果你的域名和服务器都在国内,还是绕不过一个话题,就是网站备案的事情,现在网站备案也没有过去那么复杂了,我个人建议:麻烦就麻烦点,保证以后能够正常访问。先准备好自己的网站备案。建议域名和服务器,还有网站备案的操作都在腾讯云,方便些。如果你比较抵触网站备案,那么在国内不备案的话,基本服务都关联不起来,你域名和服务器全部在国外,不用备案,但是会存在被墙风险,这两个方面,读者可以自行评估选择。
腾讯云:1 核 + 2GB + 1Mbps + 50G 系统盘
服务器操作系统:CentOS 7.7 64 位
服务器按照以上配置选,我觉得前期基本上够用了,暂时都不用购买数据盘,除非你的博客文件多且大,先有效的利用起来。服务器操作系统,我这边选择的比较新的 CentOS 7.7 64 位。
服务器管理后台配置确认
服务器端的安全组的配置很重要,购买云服务器的时候,你可能选择了,也可能没有,或者是选择了一个通用的配置,但是一定要确认一些配置是打开的,保证我们以后的网站服务能够正常连接和运行。像腾讯云管理后台中服务器示例的设置里面,我们就可以看到有一个:更多 -> 安全组 -> 实例端口验通:
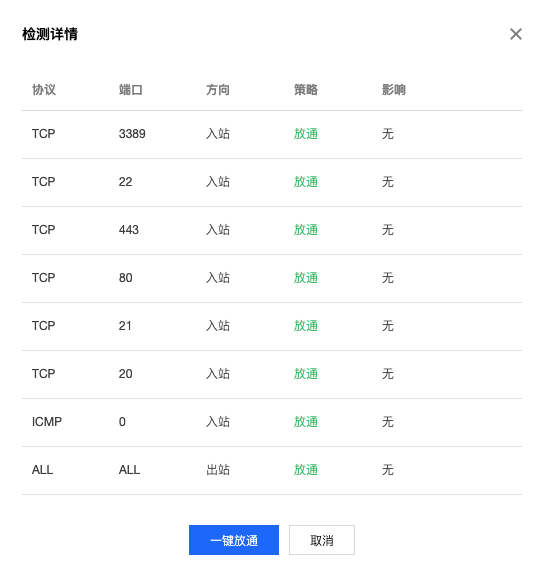
以上表格中的端口说明如下:
3389:Windows 远程桌面服务的端口,可开可不开。我们用的是 Linux 的。
22:SSH 协议端口,我们需要用到。
443:用于 https 服务的,我们也需要用到。
80:http 服务默认端口,很明显我们也需要用到。
20/21:FTP 服务,打开也没有什么太大影响。
我们要确保最核心的 22/443/80 端口的开启,后面都需要用到的。如果你发现你的服务或者端口不生效,一定要先过来查一下安全组设置,里面有很详细可以设置的内容。
Termius/FileZilla/AppNode
针对服务器的远程登录连接工具,我还是推荐 Termius,好看好用,而且基础免费版本就够用了。针对文件的上传下载等操作,我推荐 FileZilla,免费开源的工具,很好用。还有一个推荐的 Linux 管理工具(需要安装到服务器端的):AppNode,之所以推荐这个工具,就是针对新手来说,在 Linux 服务器端直接编辑文本文件,对于 vi/vim 不是很熟的人,会是非常痛苦的一件事情,你说通过 FileZilla 工具将文件下载下来再编辑,又麻烦了一点,那么这个 AppNode 是一个可视化的 Linux 服务器管理工具,在线文件编辑非常好用,对新手很友好,而且 UI 看的挺舒服。
准备 AppNode 工具
我们先下载安装 Termius,然后填入相关的服务器信息:NEW HOST -> Address (服务器公网 IP 地址),端口 22 默认,用户名:root,密码:*****,然后点击保存登录进去。去到 AppNode 官网安装页面:https://www.appnode.com/install
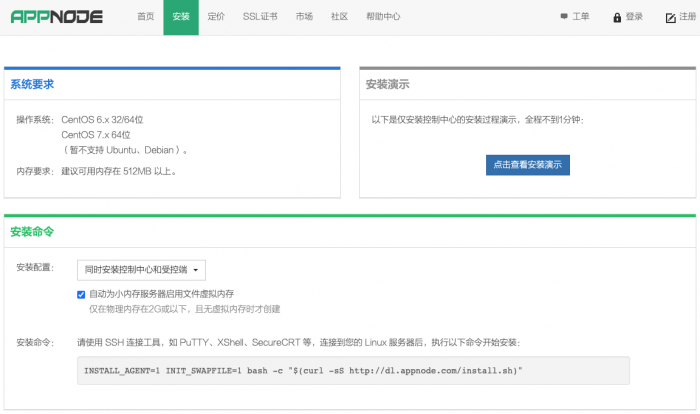
我们选择:同时安装控制中心和受控端,然后复制下面的命令行:
INSTALL_AGENT=1 INIT_SWAPFILE=1 bash -c "$(curl -sS http://dl.appnode.com/install.sh)"
我们在登录上服务器的 Termius 上黏贴并回车,中间会出现一些让你配置相关端口和账号的信息,自己设置一下就可以了。
>> AppNode CCenter configuration

* Port [default: 8888]:
* Admin username [default: admin]: root
* Admin password [default: ewsDHeZU]: ews3deZU
* Is configuration right? [Y/n] Y
AppNode 完成安装之后,会在最后提醒你服务器端 URL 访问地址,用户名和密码,记录下来。AppNode 安装之后,针对于控制中心和受控端,就是开机自启动的。另外如果你的 AppNode 链接不能访问,首先查一下是不是默认 8888 端口没有开启,在云服务器管理后台安全组里面设置下即可。
安装 Nginx 服务并启动,设置开机启动
Nginx 是用来支撑 Web 服务的,我们可以通过以下命令行来安装 Nginx:
yum install nginx //此命令中间会提醒要不要安装,输入 y 即可
或者
yum install nginx -y //相当于直接输入了过程中的参数 y 表示可以安装
我们通过以下命令查看 Nginx 状态:
systemctl status nginx.service

# systemctl status nginx.service
● nginx.service - The nginx HTTP and reverse proxy server
   Loaded: loaded (/usr/lib/systemd/system/nginx.service; disabled; vendor preset: disabled)
   Active: inactive (dead)

Jul 14 20:10:07 VM_0_14_centos systemd[1]: Unit nginx.service cannot be reloaded b...e.
Hint: Some lines were ellipsized, use -l to show in full.
很显然,我们刚刚安装了 Nginx 并没有启动它,所以显示的 Nginx 不是活跃的。我们通过以下命令来启动 Nginx 和保证 Nginx 开机启动:
# systemctl start nginx.service
# systemctl status nginx.service
● nginx.service - The nginx HTTP and reverse proxy server
   Loaded: loaded (/usr/lib/systemd/system/nginx.service; disabled; vendor preset: disabled)
   Active: active (running) since Tue 2020-07-14 20:13:12 CST; 2s ago
  Process: 10731 ExecStart=/usr/sbin/nginx (code=exited, status=0/SUCCESS)
  Process: 10729 ExecStartPre=/usr/sbin/nginx -t (code=exited, status=0/SUCCESS)
  Process: 10727 ExecStartPre=/usr/bin/rm -f /run/nginx.pid (code=exited, status=0/SUCCESS)
 Main PID: 10733 (nginx)
   CGroup: /system.slice/nginx.service
           ├─10733 nginx: master process /usr/sbin/nginx
           └─10734 nginx: worker process

Jul 14 20:13:12 VM_0_14_centos systemd[1]: Starting The nginx HTTP and reverse pro.....
Jul 14 20:13:12 VM_0_14_centos nginx[10729]: nginx: the configuration file /etc/ng...ok
Jul 14 20:13:12 VM_0_14_centos nginx[10729]: nginx: configuration file /etc/nginx/...ul
Jul 14 20:13:12 VM_0_14_centos systemd[1]: Failed to parse PID from file /run/ngin...nt
Jul 14 20:13:12 VM_0_14_centos systemd[1]: Started The nginx HTTP and reverse prox...r.
Hint: Some lines were ellipsized, use -l to show in full.
# systemctl enable nginx.service
Created symlink from /etc/systemd/system/multi-user.target.wants/nginx.service to /usr/lib/systemd/system/nginx.service.
Nginx 相关的命令:
systemctl start nginx.service
systemctl stop nginx.service
systemctl reload nginx.service
systemctl status nginx.service
安装 MySQL
我们接下来安装一下 MySQL,需要注意的是:从 CentOS 7 之后,官方安装命令中已经不再支持直接安装 MySQL,但是我们还可以通过以下操作来安装 MySQL,以下命令适合于 CentOS 7:
//下载 MySQL 源
wget https://dev.mysql.com/get/mysql57-community-release-el7-9.noarch.rpm
//安装相关包
rpm -ivh mysql57-community-release-el7-9.noarch.rpm
//安装 MySQL,过程中输入 y 同意即可
yum install mysql-server
安装好 MySQL 服务之后,我们通过以下命令来启动 MySQL 服务和设置 MySQL 服务开机启动:
//启动 MySQL 服务
systemctl start mysqld
//设置开机启动 MySQL 服务
systemctl enable mysqld.service
我们通过以下命令来查询 MySQL 默认的初始密码:
//查询默认的 MySQL 密码
grep password /var/log/mysqld.log
2020-07-14T13:04:47.534929Z 1 [Note] A temporary password is generated for root@localhost: K94YjT9tS!6/
下一步,我们针对 MySQL 做一些基础操作,输入命令:mysql_secure_installation。MySQL 安全安装向导,此过程先输入默认密码,然后修改默认密码,同时移除匿名用户,禁止 root 用户远程登录,移除测试数据库。
# mysql_secure_installation

Securing the MySQL server deployment.

Enter password for user root:

The existing password for the user account root has expired. Please set a new password.

New password:

Re-enter new password:
The 'validate_password' plugin is installed on the server.
The subsequent steps will run with the existing configuration
of the plugin.
Using existing password for root.

Estimated strength of the password: 100
Change the password for root ? ((Press y|Y for Yes, any other key for No) : y

New password:

Re-enter new password:

Estimated strength of the password: 100
Do you wish to continue with the password provided?(Press y|Y for Yes, any other key for No) : y
By default, a MySQL installation has an anonymous user,
allowing anyone to log into MySQL without having to have
a user account created for them. This is intended only for
testing, and to make the installation go a bit smoother.
You should remove them before moving into a production
environment.

Remove anonymous users? (Press y|Y for Yes, any other key for No) : y
Success.


Normally, root should only be allowed to connect from
'localhost'. This ensures that someone cannot guess at
the root password from the network.

Disallow root login remotely? (Press y|Y for Yes, any other key for No) : y
Success.

By default, MySQL comes with a database named 'test' that
anyone can access. This is also intended only for testing,
and should be removed before moving into a production
environment.


Remove test database and access to it? (Press y|Y for Yes, any other key for No) : y
 - Dropping test database...
Success.

 - Removing privileges on test database...
Success.

Reloading the privilege tables will ensure that all changes
made so far will take effect immediately.

Reload privilege tables now? (Press y|Y for Yes, any other key for No) :

 ... skipping.
All done!
下面,我们创建一个数据库用于 WordPress 使用:
# mysql -uroot -p
Enter password:
Welcome to the MySQL monitor.  Commands end with ; or \g.
Your MySQL connection id is 5
Server version: 5.7.31 MySQL Community Server (GPL)

Copyright (c) 2000, 2020, Oracle and/or its affiliates. All rights reserved.

Oracle is a registered trademark of Oracle Corporation and/or its
affiliates. Other names may be trademarks of their respective
owners.

Type 'help;' or '\h' for help. Type '\c' to clear the current input statement.

mysql> create database wordpress;
Query OK, 1 row affected (0.00 sec)

mysql> use wordpress;
Database changed
mysql> exit
Bye
安装 PHP
PHP 是用来支撑 WordPress 运行的,WordPress 就是用 PHP 来开发的,通过以下命令来安装 PHP:
//安装 php-fpm:使 php 与 nginx 关联。php-mysql 为 php 与 mysql 关联
yum install php-fpm php-mysql
systemctl start php-fpm     # 启动 php-fpm
systemctl enable php-fpm    # 设置开机启动
安装 WordPress 博客
我们去到 WordPress 官网找到中文版本的 WordPress 下载链接:https://cn.wordpress.org/latest-zh_CN.tar.gz。我们通过以下命令下载安装 WordPress 到指定目录:usr/share/wordpress。
# cd usr/share
# wget https://cn.wordpress.org/latest-zh_CN.tar.gz
--2020-07-15 10:02:53--  https://cn.wordpress.org/latest-zh_CN.tar.gz
Resolving cn.wordpress.org (cn.wordpress.org)... 198.143.164.252
Connecting to cn.wordpress.org (cn.wordpress.org)|198.143.164.252|:443... connected.
HTTP request sent, awaiting response... 200 OK
Length: 12924846 (12M) [application/octet-stream]
Saving to: ‘latest-zh_CN.tar.gz’

100%[=============================================>] 12,924,846   142KB/s   in 1m 47s

2020-07-15 10:04:42 (117 KB/s) - ‘latest-zh_CN.tar.gz’ saved [12924846/12924846]

[root@VM_0_14_centos share]# tar zxvf latest-zh_CN.tar.gz
配置 WordPress 服务,让 WordPress 跑起来
这样我们的 WordPress 的基本安装搞好了,我们先来测试下 Nginx 服务有没有问题。我们地址栏输入自己的服务器公网 IP 访问,如果出现:Welcome to CentOS 等正常页面,说明 Nginx 服务配置没有什么太大问题。
接下来我们在 WordPress 的配置文件中关联数据库,我们通过 AppNode 管理后台 -> 文件管理,然后找到以下文件:/usr/share/wordpress/wp-config-sample.php。
<?php
/**
 * WordPress基础配置文件。
 *
 * 这个文件被安装程序用于自动生成wp-config.php配置文件,
 * 您可以不使用网站,您需要手动复制这个文件,
 * 并重命名为“wp-config.php”,然后填入相关信息。
 *
 * 本文件包含以下配置选项:
 *
 * * MySQL设置
 * * 密钥
 * * 数据库表名前缀
 * * ABSPATH
 *
 * @link https://codex.wordpress.org/zh-cn:%E7%BC%96%E8%BE%91_wp-config.php
 *
 * @package WordPress
 */

// ** MySQL 设置 - 具体信息来自您正在使用的主机 ** //
/** WordPress数据库的名称 */
define( 'DB_NAME', 'database_name_here' );

/** MySQL数据库用户名 */
define( 'DB_USER', 'username_here' );

/** MySQL数据库密码 */
define( 'DB_PASSWORD', 'password_here' );

/** MySQL主机 */
define( 'DB_HOST', 'localhost' );

/** 创建数据表时默认的文字编码 */
define( 'DB_CHARSET', 'utf8' );

/** 数据库整理类型。如不确定请勿更改 */
define( 'DB_COLLATE', '' );

/**#@+
 * 身份认证密钥与盐。
 *
 * 修改为任意独一无二的字串!
 * 或者直接访问{@link https://api.wordpress.org/secret-key/1.1/salt/ WordPress.org密钥生成服务}
 * 任何修改都会导致所有cookies失效,所有用户将必须重新登录。
 *
 * @since 2.6.0
 */
define( 'AUTH_KEY',         'put your unique phrase here' );
define( 'SECURE_AUTH_KEY',  'put your unique phrase here' );
define( 'LOGGED_IN_KEY',    'put your unique phrase here' );
define( 'NONCE_KEY',        'put your unique phrase here' );
define( 'AUTH_SALT',        'put your unique phrase here' );
define( 'SECURE_AUTH_SALT', 'put your unique phrase here' );
define( 'LOGGED_IN_SALT',   'put your unique phrase here' );
define( 'NONCE_SALT',       'put your unique phrase here' );

/**#@-*/

/**
 * WordPress数据表前缀。
 *
 * 如果您有在同一数据库内安装多个WordPress的需求,请为每个WordPress设置
 * 不同的数据表前缀。前缀名只能为数字、字母加下划线。
 */
$table_prefix = 'wp_';

/**
 * 开发者专用:WordPress调试模式。
 *
 * 将这个值改为true,WordPress将显示所有用于开发的提示。
 * 强烈建议插件开发者在开发环境中启用WP_DEBUG。
 *
 * 要获取其他能用于调试的信息,请访问Codex。
 *
 * @link https://codex.wordpress.org/Debugging_in_WordPress
 */
define('WP_DEBUG', false);

/* 好了!请不要再继续编辑。请保存本文件。使用愉快! */

/** WordPress目录的绝对路径。 */
if ( ! defined( 'ABSPATH' ) ) {
	define( 'ABSPATH', dirname( __FILE__ ) . '/' );
}

/** 设置WordPress变量和包含文件。 */
require_once( ABSPATH . 'wp-settings.php' );
我们可以看到以上文件中的头部注释提到:这个文件被安装程序用于自动生成 wp-config.php 配置文件,您可以不使用网站,您需要手动复制这个文件,并重命名为 “wp-config.php”,然后填入相关信息。
大致的意思就是我们可以通过修改此文件名和配置相关信息,我们接下来配置相关的信息,修改任何配置文件之前,要养成备份的好习惯,如果修改出问题了,可以立马恢复过来!
按照前面 MySQL 中创建的针对 WordPress 的数据库,以及相关账号信息,填到下面:
// ** MySQL 设置 - 具体信息来自您正在使用的主机 ** //
/** WordPress数据库的名称 */
define( 'DB_NAME', 'wordpress' );

/** MySQL数据库用户名 */
define( 'DB_USER', 'root' );

/** MySQL数据库密码 */
define( 'DB_PASSWORD', '*********' );
然后将文件名称 wp-config-sample.php 修改成 wp-config.php 并保存。然后我们去到 /etc/nginx/conf.d/ 路径下创建一个 wordpress.conf 文件,然后配置以下内容:
server {
    listen 80;
    root /usr/share/wordpress;
    location / {
        index index.php index.html index.htm;
        try_files $uri $uri/ /index.php index.php;
    }
    # pass the PHP scripts to FastCGI server listening on 127.0.0.1:9000
    location ~ .php$ {
        fastcgi_pass   127.0.0.1:9000;
        fastcgi_index  index.php;
        fastcgi_param  SCRIPT_FILENAME  $document_root$fastcgi_script_name;
        include        fastcgi_params;
    }
}
下一步,我们将 /etc/nginx/nginx.conf 文件中的 server 段注销掉:
# For more information on configuration, see:
#   * Official English Documentation: http://nginx.org/en/docs/
#   * Official Russian Documentation: http://nginx.org/ru/docs/

user nginx;
worker_processes auto;
error_log /var/log/nginx/error.log;
pid /run/nginx.pid;

# Load dynamic modules. See /usr/share/doc/nginx/README.dynamic.
include /usr/share/nginx/modules/*.conf;

events {
    worker_connections 1024;
}

http {
    log_format  main  '$remote_addr - $remote_user [$time_local] "$request" '
                      '$status $body_bytes_sent "$http_referer" '
                      '"$http_user_agent" "$http_x_forwarded_for"';

    access_log  /var/log/nginx/access.log  main;

    sendfile            on;
    tcp_nopush          on;
    tcp_nodelay         on;
    keepalive_timeout   65;
    types_hash_max_size 2048;

    include             /etc/nginx/mime.types;
    default_type        application/octet-stream;

    # Load modular configuration files from the /etc/nginx/conf.d directory.
    # See http://nginx.org/en/docs/ngx_core_module.html#include
    # for more information.
    include /etc/nginx/conf.d/*.conf;

    server {
        listen       80 default_server;
        listen       [::]:80 default_server;
        server_name  _;
        root         /usr/share/nginx/html;

        # Load configuration files for the default server block.
        include /etc/nginx/default.d/*.conf;

        location / {
        }

        error_page 404 /404.html;
            location = /40x.html {
        }

        error_page 500 502 503 504 /50x.html;
            location = /50x.html {
        }
    }

# Settings for a TLS enabled server.
#
#    server {
#        listen       443 ssl http2 default_server;
#        listen       [::]:443 ssl http2 default_server;
#        server_name  _;
#        root         /usr/share/nginx/html;
#
#        ssl_certificate "/etc/pki/nginx/server.crt";
#        ssl_certificate_key "/etc/pki/nginx/private/server.key";
#        ssl_session_cache shared:SSL:1m;
#        ssl_session_timeout  10m;
#        ssl_ciphers HIGH:!aNULL:!MD5;
#        ssl_prefer_server_ciphers on;
#
#        # Load configuration files for the default server block.
#        include /etc/nginx/default.d/*.conf;
#
#        location / {
#        }
#
#        error_page 404 /404.html;
#            location = /40x.html {
#        }
#
#        error_page 500 502 503 504 /50x.html;
#            location = /50x.html {
#        }
#    }

}
我们之所以在上面配置一个 wordpress.conf 文件能够生效的原因,在于 nginx.conf 中的 36 行代码:include /etc/nginx/conf.d/*.conf; 引入了 /etc/nginx/conf.d/wordpress.conf 文件。然后我们删除掉 nginx.conf 中的 server,让 /etc/nginx/conf.d/wordpress.conf 文件中的 server 生效,加载 /usr/share/wordpress 中的 wordpress。我们用 systemctl reload nginx.service 命令重载 Nginx 服务。
然后我们用域名或者 IP 去在 Chrome 的隐身模式([macOS 下可以采用 Command + Shift + N] 快捷键调出)下加载网站,这样可以规避缓存的问题。我们去加载网站,出现一个页面,这个页面说明 WordPress 至少是关联起来了,但是存在问题:
Your server is running PHP version 5.4.16 but WordPress 5.4.2 requires at least 5.6.20.
这个就说明原来我们用 yum 的方式的 PHP 默认版本太低了,我们可以在这个官方页面看到 WordPress 针对 PHP 和 MySQL 最低版本要求。我们就先卸载原来的 PHP 版本,再安装更新的版本,我们通过 yum list installed | grep php 查询安装的 PHP,然后通过 yum -y remove php* 卸载一下。
[root@VM_0_14_centos ~]# yum list installed | grep php
Repository epel is listed more than once in the configuration
php-common.x86_64                   5.4.16-48.el7             @os
php-fpm.x86_64                      5.4.16-48.el7             @os
php-mysql.x86_64                    5.4.16-48.el7             @os
php-pdo.x86_64                      5.4.16-48.el7             @os
[root@VM_0_14_centos ~]# yum -y remove php*
Loaded plugins: fastestmirror, langpacks
Repository epel is listed more than once in the configuration
Resolving Dependencies
--> Running transaction check
---> Package php-common.x86_64 0:5.4.16-48.el7 will be erased
---> Package php-fpm.x86_64 0:5.4.16-48.el7 will be erased
---> Package php-mysql.x86_64 0:5.4.16-48.el7 will be erased
---> Package php-pdo.x86_64 0:5.4.16-48.el7 will be erased
--> Finished Dependency Resolution

Dependencies Resolved

==============================================================================================================================================
 Package                            Arch                           Version                                  Repository                   Size
==============================================================================================================================================
Removing:
 php-common                         x86_64                         5.4.16-48.el7                            @os                         3.8 M
 php-fpm                            x86_64                         5.4.16-48.el7                            @os                         4.5 M
 php-mysql                          x86_64                         5.4.16-48.el7                            @os                         232 k
 php-pdo                            x86_64                         5.4.16-48.el7                            @os                         192 k

Transaction Summary
==============================================================================================================================================
Remove  4 Packages

Installed size: 8.7 M
Downloading packages:
Running transaction check
Running transaction test
Transaction test succeeded
Running transaction
Warning: RPMDB altered outside of yum.
  Erasing    : php-mysql-5.4.16-48.el7.x86_64                                                                                             1/4
  Erasing    : php-pdo-5.4.16-48.el7.x86_64                                                                                               2/4
  Erasing    : php-fpm-5.4.16-48.el7.x86_64                                                                                               3/4
  Erasing    : php-common-5.4.16-48.el7.x86_64                                                                                            4/4
  Verifying  : php-pdo-5.4.16-48.el7.x86_64                                                                                               1/4
  Verifying  : php-fpm-5.4.16-48.el7.x86_64                                                                                               2/4
  Verifying  : php-mysql-5.4.16-48.el7.x86_64                                                                                             3/4
  Verifying  : php-common-5.4.16-48.el7.x86_64                                                                                            4/4

Removed:
  php-common.x86_64 0:5.4.16-48.el7    php-fpm.x86_64 0:5.4.16-48.el7    php-mysql.x86_64 0:5.4.16-48.el7    php-pdo.x86_64 0:5.4.16-48.el7

Complete!
我们通过以下命令来更新一下 yum 源。
yum install epel-release -y
rpm -ivh https://mirror.webtatic.com/yum/el7/webtatic-release.rpm
然后通过 yum list | grep php 命令来查询下 PHP 库。
# yum list | grep php
Repository epel is listed more than once in the configuration
php72w-bcmath.x86_64                        7.2.31-2.w7                webtatic
php72w-cli.x86_64                           7.2.31-2.w7                webtatic
php72w-common.x86_64                        7.2.31-2.w7                webtatic
php72w-dba.x86_64                           7.2.31-2.w7                webtatic
php72w-devel.x86_64                         7.2.31-2.w7                webtatic
php72w-embedded.x86_64                      7.2.31-2.w7                webtatic
php72w-enchant.x86_64                       7.2.31-2.w7                webtatic
php72w-fpm.x86_64                           7.2.31-2.w7                webtatic
php72w-gd.x86_64                            7.2.31-2.w7                webtatic
php72w-imap.x86_64                          7.2.31-2.w7                webtatic
php72w-interbase.x86_64                     7.2.31-2.w7                webtatic
php72w-intl.x86_64                          7.2.31-2.w7                webtatic
php72w-ldap.x86_64                          7.2.31-2.w7                webtatic
php72w-mbstring.x86_64                      7.2.31-2.w7                webtatic
php72w-mysql.x86_64                         7.2.31-2.w7                webtatic
php72w-mysqlnd.x86_64                       7.2.31-2.w7                webtatic
php72w-odbc.x86_64                          7.2.31-2.w7                webtatic
php72w-opcache.x86_64                       7.2.31-2.w7                webtatic
php72w-pdo.x86_64                           7.2.31-2.w7                webtatic
php72w-pdo_dblib.x86_64                     7.2.31-2.w7                webtatic
php72w-pear.noarch                          1:1.10.12-1.w7             webtatic
php72w-pecl-apcu.x86_64                     5.1.18-1.w7                webtatic
php72w-pecl-apcu-devel.x86_64               5.1.18-1.w7                webtatic
php72w-pecl-geoip.x86_64                    1.1.1-1.2.w7               webtatic
php72w-pecl-igbinary.x86_64                 3.1.2-1.w7                 webtatic
php72w-pecl-igbinary-devel.x86_64           3.1.2-1.w7                 webtatic
php72w-pecl-imagick.x86_64                  3.4.4-1.2.w7               webtatic
php72w-pecl-imagick-devel.x86_64            3.4.4-1.2.w7               webtatic
php72w-pecl-libsodium.x86_64                1.0.6-1.2.w7               webtatic
php72w-pecl-memcached.x86_64                3.1.5-1.w7                 webtatic
php72w-pecl-mongodb.x86_64                  1.7.4-1.w7                 webtatic
php72w-pecl-redis.x86_64                    3.1.6-1.w7                 webtatic
php72w-pecl-xdebug.x86_64                   2.9.6-1.w7                 webtatic
php72w-pgsql.x86_64                         7.2.31-2.w7                webtatic
php72w-phpdbg.x86_64                        7.2.31-2.w7                webtatic
php72w-process.x86_64                       7.2.31-2.w7                webtatic
php72w-pspell.x86_64                        7.2.31-2.w7                webtatic
php72w-recode.x86_64                        7.2.31-2.w7                webtatic
php72w-snmp.x86_64                          7.2.31-2.w7                webtatic
php72w-soap.x86_64                          7.2.31-2.w7                webtatic
php72w-sodium.x86_64                        7.2.31-2.w7                webtatic
php72w-tidy.x86_64                          7.2.31-2.w7                webtatic
php72w-xml.x86_64                           7.2.31-2.w7                webtatic
php72w-xmlrpc.x86_64                        7.2.31-2.w7                webtatic
phpMyAdmin.noarch                           4.4.15.10-4.el7            epel
phpPgAdmin.noarch                           5.6-11.el7                 epel
phpldapadmin.noarch                         1.2.3-10.el7               epel
phpwapmail.noarch                           0.9.5-1.el7                epel
remctl-php.x86_64                           3.14-1.el7                 epel
rrdtool-php.x86_64                          1.4.8-9.el7                os
uuid-php.x86_64                             1.6.2-26.el7               os
uwsgi-plugin-php.x86_64                     2.0.18-8.el7               epel
再通过以下命令安装 php-fpm php-mysql:
# yum install -y php72w-fpm.x86_64 php72w-mysql.x86_64
通过 yum list installed | grep php 命令查询安装的 PHP,和之前的是一样的几个。
# yum list installed | grep php
Repository epel is listed more than once in the configuration
php72w-common.x86_64                7.2.31-2.w7               @webtatic
php72w-fpm.x86_64                   7.2.31-2.w7               @webtatic
php72w-mysql.x86_64                 7.2.31-2.w7               @webtatic
php72w-pdo.x86_64                   7.2.31-2.w7               @webtatic
# systemctl start php-fpm     # 启动 php-fpm
# systemctl enable php-fpm    # 设置开机启动
我们再去访问网站首页,你就会发现出现以下页面了,说明关联成功了!
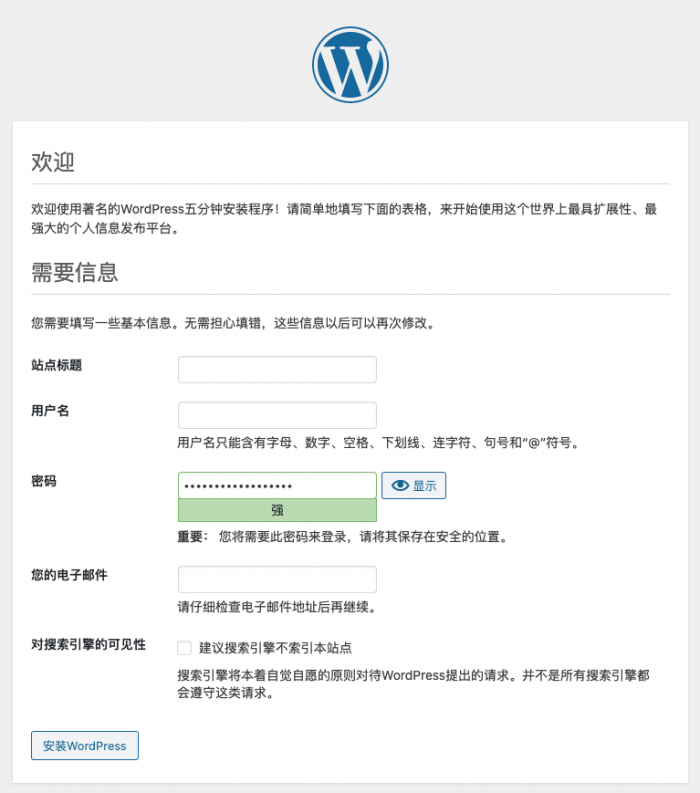
我们填写好相关信息,然后点击安装 WordPress,然后就大功告成啦!
添加备案信息,添加网站统计,禁止 IP 访问,域名跳转,https 启用,网站 URL 优化
我们接下来准备好相关的域名,比如我帮朋友弄的博客,域名是 oulaija.com 托管到腾讯云的,我们先解析下域名,域名解析中做如下处理:

另外我们准备一下针对 oulaija.com 和 www.oulaija.com 域名的 SSL 证书,SSL 证书有免费的也有付费的,免费的也可以用,推荐使用腾讯云免费 SSL,在腾讯云管理后台可以申请,很快就可以下来,由于我这边的逻辑都是将所有的链接最终跳转到 www.oulaija.com 的,那么我的域名 SSL 证书就指定 www.oulaija.com,付费的 SSL 推荐参考这篇文章:《WordPress 博客启用 https》
在腾讯云申请一个免费的针对 www.oulaija.com 的 SSL 证书:我们是 Nginx 服务,我们准备好通用的 .csr 文件和 Nginx 文件夹底下的 .crt 和 .key 文件。
前面我们已经准备好了自己的 SSL 证书的三个文件:.csr/.key/.crt 文件。我们将这三个文件放到 /etc/ssl/private/ 位置:
/etc/ssl/private/oulaija.com.csr
/etc/ssl/private/oulaija.com.key
/etc/ssl/private/ssl.bundle.crt
然后将 /etc/nginx/conf.d/wordpress.conf 文件修改成以下配置,请注意按照自己对应的域名来修改:
server {
    listen       80 default_server;
    server_name  _;
    return       404;
}

//域名配置,强制使用 https 跳转 : 配置的时候,请把此行删除掉!!!!
server {
    listen       80;
    server_name  oulaija.com;
    server_name  www.oulaija.com;
    rewrite      ^(.*)$ https://$host$1 permanent;
}

//启用 https,配置相关证书: 配置的时候,请把此行删除掉!!!!
server {
      listen 443;
      ssl on;
      ssl_certificate            /etc/ssl/private/ssl.bundle.crt;
      ssl_certificate_key        /etc/ssl/private/oulaija.com.key;
      return 500;
}

server {
    listen                     80;
    listen                     443 ssl;
    server_name                oulaija.com;
    server_name                www.oulaija.com;
    root 		       /usr/share/wordpress;
    index                      index.html index.htm index.php;
    keepalive_timeout          70;
    error_page                 502 /error_pages/502.html;
    error_page                 503 /error_pages/503.html;
    error_page                 504 /error_pages/504.html;
    error_page                 403 /error_pages/403.html;
    error_page                 404 /error_pages/404.html;
    error_page                 500 /error_pages/500.html;
    ssl                        on;
    ssl_certificate            /etc/ssl/private/ssl.bundle.crt;
    ssl_certificate_key        /etc/ssl/private/oulaija.com.key;
    ssl_ciphers                'EECDH+ECDSA+AESGCM EECDH+aRSA+AESGCM EECDH+ECDSA+SHA384 EECDH+ECDSA+SHA256 EECDH+aRSA+SHA384 EECDH+aRSA+SHA256 EECDH+aRSA+RC4 EECDH EDH+aRSA !aNULL !eNULL !LOW !3DES !MD5 !EXP !PSK !SRP !DSS !RC4';
    ssl_dhparam                /etc/ssl/private/dhparam.pem;
    ssl_prefer_server_ciphers  on;
    ssl_protocols              TLSv1.2 TLSv1.1 TLSv1;
    ssl_session_cache          shared:SSL:10m;
    ssl_session_timeout        10m;
    add_header                 Strict-Transport-Security max-age=31536000;
    add_header                 X-Content-Type-Options nosniff;
    rewrite                    ^.*/files/(.*)$ /wp-includes/ms-files.php?file=$1 last;

    if (!-e $request_filename) {
        rewrite  ^.+?(/wp-.*) $1 last;
        rewrite  ^.+?(/.*\.php)$ $1 last;
        rewrite  ^ /index.php last;
    }

    location ~ ^/.+\.php {
        fastcgi_index            index.php;
        fastcgi_split_path_info  ^(.+\.php)(.*)$;
        fastcgi_param            SCRIPT_FILENAME $document_root$fastcgi_script_name;
        fastcgi_param            PATH_INFO $fastcgi_path_info;
        fastcgi_param            QUERY_STRING $query_string;
        fastcgi_param            REQUEST_METHOD $request_method;
        fastcgi_param            CONTENT_TYPE $content_type;
        fastcgi_param            CONTENT_LENGTH $content_length;
        fastcgi_param            SCRIPT_NAME $fastcgi_script_name;
        fastcgi_param            REQUEST_URI $request_uri;
        fastcgi_param            DOCUMENT_URI $document_uri;
        fastcgi_param            DOCUMENT_ROOT $document_root;
        fastcgi_param            SERVER_PROTOCOL $server_protocol;
        fastcgi_param            GATEWAY_INTERFACE CGI/1.1;
        fastcgi_param            SERVER_SOFTWARE nginx/$nginx_version;
        fastcgi_param            REMOTE_ADDR $remote_addr;
        fastcgi_param            REMOTE_PORT $remote_port;
        fastcgi_param            SERVER_ADDR $server_addr;
        fastcgi_param            SERVER_PORT $server_port;
        fastcgi_param            SERVER_NAME $server_name;
        fastcgi_param            REDIRECT_STATUS 200;
        fastcgi_param            PHP_VALUE open_basedir=$document_root:/tmp/:/proc/:/var/lib/php-fpm/;
        fastcgi_pass             127.0.0.1:9000;
    }

    location ~* \.(js|css|jpg|gif|png|bmp|swf)$ {
        expires  30d;
    }
}
为了更安全考虑,我们通过在 /etc/ssl/private/ 目录底下用命令来生成一个 .pem 文件:
openssl dhparam -out /etc/ssl/private/dhparam.pem 2048
Generating DH parameters, 2048 bit long safe prime, generator 2
This is going to take a long time
修改好保存之后,我们重载 Nginx 服务:
systemctl reload nginx.service
我们登录到 WordPress 的管理后台,配置好网站的地址:
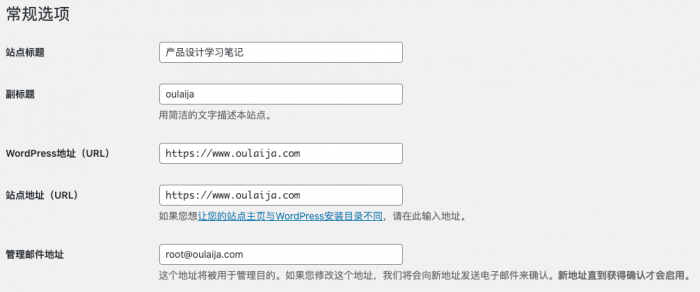
我推荐将个人网站 URL oulaija.com 全部指向 www.oulaija.com,然后禁止 IP 地址访问,这样的网站 SEO 会更好些。然后检验网站各种访问地址,都没有问题,网站的搭建,大功告成!
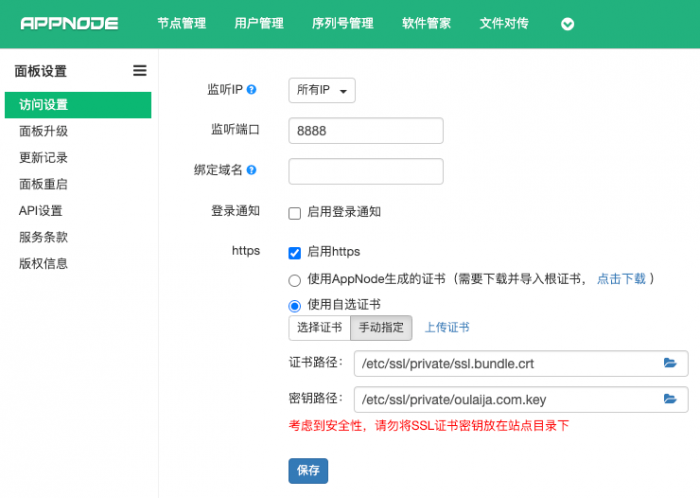
还有一个我们 AppNode 管理后台配置一个 https 访问,这样都可以规避 IP + 端口的访问了:
接下来我们在 WordPress 博客的首页底部加上备案号信息及相关链接,在国内的域名和服务器都要有这个展示,否则工信部会阶段性的检查。一般我们找到你当前使用的主题,然后在主题里面的 footer.php 文件里面修改,比如我目前使用的主题的具体文件路径:
/usr/share/wordpress/wp-content/themes/kratos-3.0.11/footer.php
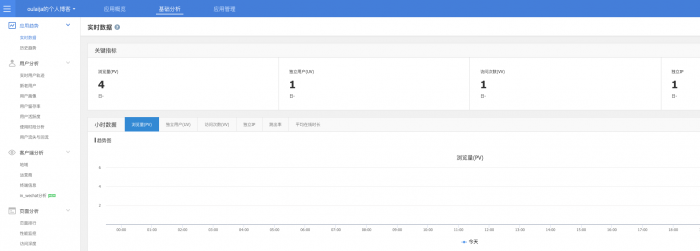
另外我也建议大家追加一个网站统计功能,追踪你的网站的访问量,我平时比较喜欢用腾讯的产品,因为他登录方便是最大的优势,另外产品的 UI 和交互设计不错,产品只要过得去,我都会用。我之前的网站统计都是用腾讯统计,但是最近官网建议迁移到腾讯移动分析,那我们就用腾讯移动分析来创建网站统计了,登录到腾讯移动分析,创建一个 Web 应用,填写相关资料,最后提示让你嵌入以下代码到你的网站:
<script>
var _mtac = {};
(function() {
    var mta = document.createElement("script");
    mta.src = "//pingjs.qq.com/h5/stats.js?v2.0.4";
    mta.setAttribute("name", "*****");
    mta.setAttribute("sid", "*****");
    var s = document.getElementsByTagName("script")[0];
    s.parentNode.insertBefore(mta, s);
})();
</script>
注意网站上关键的提醒:请将代码放置在所有引入 js 类库的最后一个,在

 微信扫一扫,打赏作者吧~